
INCORRECT (file size submitted = 3.5" x 2")
This file does not have a bleed.

INCORRECT (file sizes vary with crop marks)
This file has crop marks and does not have a bleed.
INCORRECT (file sizes vary with crop marks)
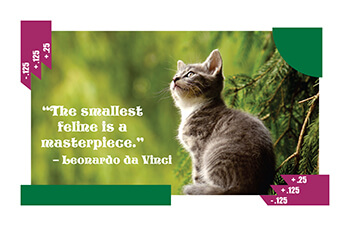
This file has two sets of marks - bleed marks and
crop marks that go over the artwork.
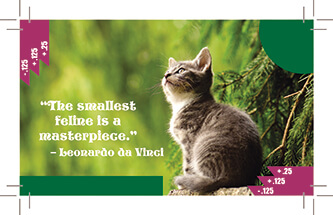
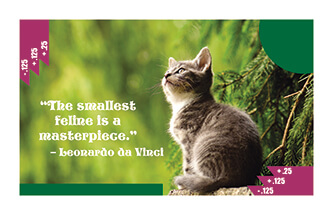
INCORRECT (file size submitted = 3.75" x 2.25")
This file has the correct file size to accommodate bleed but some elements (the photo and partial circle) are
not properly extended all the way into the bleed area.

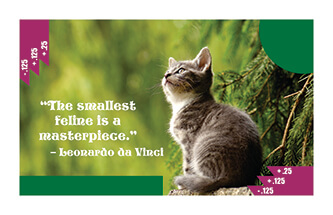
INCORRECT (file size submitted = 3.75" x 2.25")
This file has poor margins. Notice that the text is placed
at the edge where the finished piece will be cut.
NOT PREFERRED (file sizes vary with crop marks)
Files with proper bleed, margin, and crop marks can be accepted for many print items. For some items, we may ask that files are resent without crop marks.
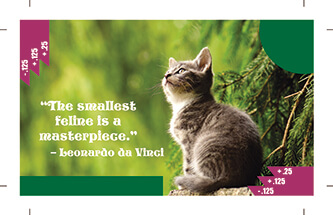
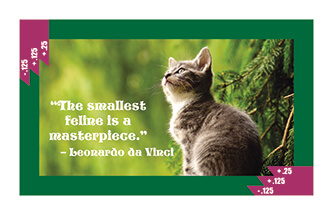
CORRECT (file size submitted = 3.75" x 2.25")
This file has proper bleed and margin.
It does not have crop marks.
DESIGN WARNING
Be careful of using thin lines at the edges (note the
green bar at the bottom). The finished cut from this
design will leave a very thin line or maybe none at all.
DESIGN WARNING
Borders are not recommended.
If the cut is slightly off or crooked, a border
will accentuate these minor imprecisions.
Importance of Bleed and Margin
It's important to know that cutting can be imprecise. Bleed and Margin each perform an important function that work in tandem with cutting in mind in an effort to produce a professional looking finished piece. Like Peanut Butter and Jelly, Salt and Pepper, or Bert and Ernie.
What is a Bleed?
A bleed is the extra image or background, generally 1/8" (.125), that extends beyond the cut area of your printing piece. Printing jobs are printed on oversized sheets and cut to size giving the appearance that the background color or image is "bleeding" off the edge of the paper. It is important that all background colors and images at the edge of the sheet have a proper bleed.
Why is Bleed Important?
Without a bleed the final printed piece may have uneven white borders. These white borders can be as wide as 1/8", sometimes more, or just a sliver. These white borders can vary for every sheet of the job.
Have you ever tried to cut a coupon exactly on the dotted line and invariably gone off track? How much more success would you have if that dotted line was much thicker? That's the basic concept and importance of a bleed.
What is a Margin?
The Margin, or Safety, is a buffer zone between the cut area and important items such as text, logo, and other images. Just as we advise that the bleed extend beyond the cut, we equally advise that your important information and items are moved in away from the cut. Our rule of thumb is 1/8" for small items such as business cards and 1/4" for larger items like postcards and flyers.
Why is Margin Important?
What happens if your artwork is designed with your address at the edge of the cut and the cutting happens to drift an 1/8" left or right? Your important address of "12345" may become "2345". Having these elements so close to the edge can look untidy and haphazard. Having a margin built in makes for a more professional and aesthetically pleasing finished design.
How to Submit Files with Bleed
Keep cutting in mind when designing and building in your bleed. Ask yourself how will the final piece look when it is cut down to its final size. How will it look if the cut happens to move up, down, left, or right? Could something be clipped? Could a little bit of white or some other mark show on the edge? If so, you may want to adjust your design.
From Design Programs (Adobe Illustrator, Adobe, In Design, Corel Draw):
- Set your canvas to the finished size of the item you want. (e.g. the canvas size of a business card is 3.5" x 2")
- Do not set multiple items up. Our software will do this.
- Use document settings to add a bleed of .125" and design you artwork to go to these lines.
- Save your document to a PDF at High Print Quality, uncheck Preserve Editing Capabilities,
and add .125" in the Bleed Settings.
- Do not add any marks. (i.e. crop marks, trim marks, color bars)
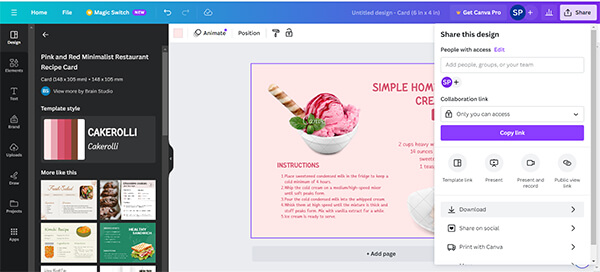
From Canva:
- Select a template or product that is the size of the product that you want.
- Canva has bleeds built in but does not show guidelines by default. You can add guidelines by going to File > View Settings > Add Guides. Set Columns and Rows at 1. Both Gaps at 0. Both Margins at 0.13 in.
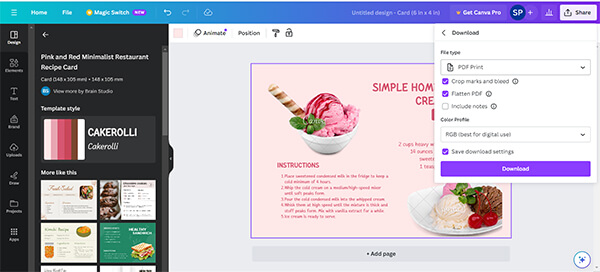
- Save by going to Share > Download. Under File Type select PDF Print. Check Crops and Bleed. Check Flatten PDF.
Color Profile at CMYK (professional version only). RGB will suffice for free versions. Download.
From Other Programs (Adobe Photoshop, Microsoft Word):
- Set your canvas .25" larger than the finished size of the item you want.
(e.g. the canvas size of the business card would be 3.75" x 2.25")
- Do not set multiple items up. Our software will do this.
- Set guidelines to help you know where your cut and margin lines are and design your
artwork to the edge of the canvas.
- Save your document to a PDF at High Print Quality, uncheck Preserve Editing Capabilities if available.
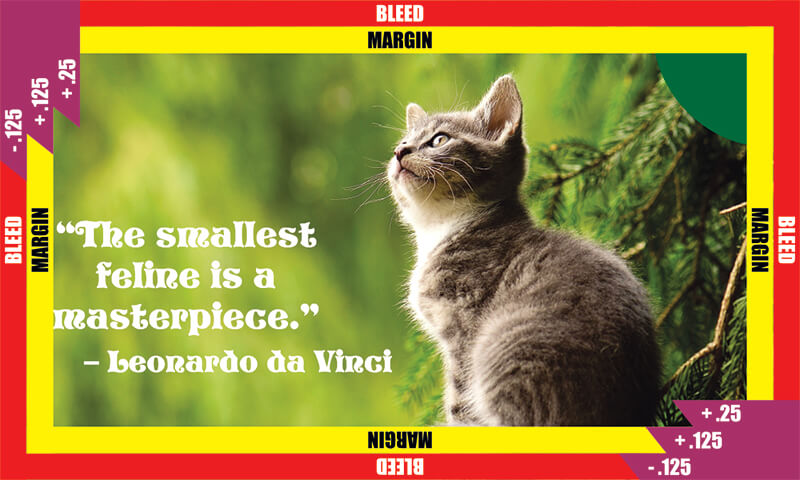
A sample business card file set at 3.75" x 2.25" highlighting bleed and margin.
Compare to the images on the left to see how the bleeds and margins are being used properly or improperly.
Importance Vector Art
Why is a Vector Logo the Best Format?
A vector graphic is a format where the graphic is made up of 2D points, curves, and lines based on mathematical equations. A non vector graphic is made up of multiple little square pixels, each with a different color.
Why Does This Matter?
A vector logo can easily be resized without compromising the quality of the image because it uses math and algorithms to keep everything in place.
As a non-vector logo is a pixel based image, once you begin to stretch the logo or zoom in, you start to see those squares, which makes your logo appear distorted, blurry/fuzzy and low-quality.
A vector logo is more flexible and results in a sharper image at any size. We can vectorize you logo for you for a small charge.
File Requirements
Submit only one piece of artwork. Do not design or submit multiple-up files to fill a sheet of paper. We will account for that when printing your job.
SPECIFIC REQUIREMENT FOR BOOKLETS
When setting up saddle stitched booklets for print, we have very precise requirements in order for a satisfactory result.
- Please set up pages as individual, consecutive pages (not printer's spread format)
- If a full bleed is required (i.e. no white margins around edges) ensure the bleed is set to .125” on ALL sides.
For example, if your finished piece is an 8.5" x 11" booklet, each page size should be set to 8.75” x 11.25"
- When adding the design/content, maintain generous margins. Remember each page will be cut to your finished size (i.e. trimmed on all edges by 1/8"). To avoid accidental cutting of text and graphics ensure all elements are safely within these constraints
- DO NOT include crop marks on the finished file.
- Finally save your design as a flattened PDF ensuring you select:
No crop marks, and include the 1/8” bleed, high quality, turn off editing capabilities.
Observing the above, should result in a finished PDF file that is print-ready and including all necessary bleeds.